



Guy Grip Guide: What It Is, How It Works and How to Choose One
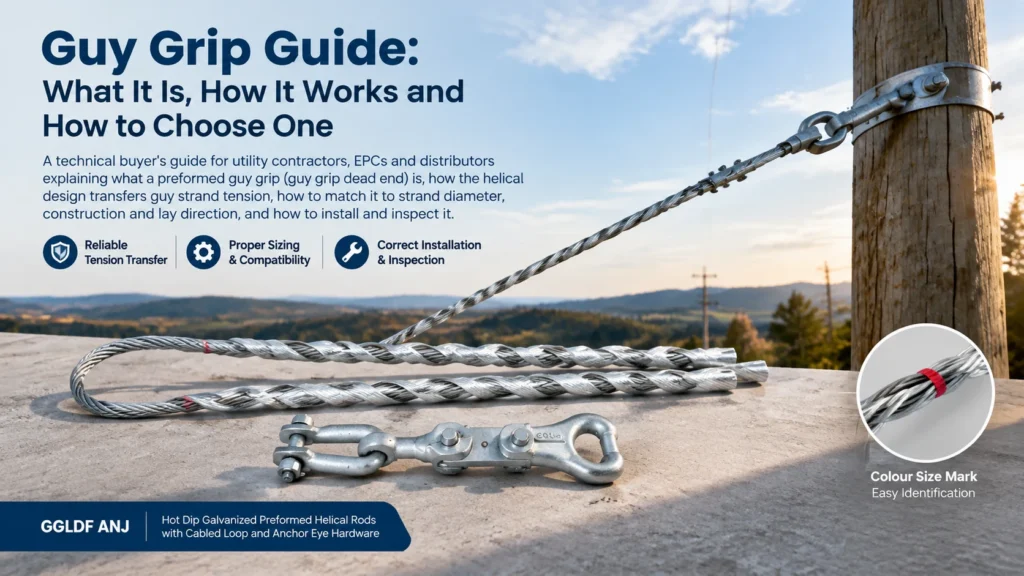
A guy grip is the preformed helical dead-end that terminates a guy strand at a pole anchor. It is a small, unglamorous part of an overhead line, but it carries a job that matters: keep the pole plumb. If the grip slips, the pole leans, conductor clearances change, and the next storm finishes the work. Unlike a bolted clamp, a guy grip has no bolts to torque and no moving parts to seize — its holding strength comes from geometry, which is exactly why the wrong size or the wrong lay direction fails quietly instead of loudly.
This guide explains what a preformed guy grip does, how the helical grip generates its holding force, how it compares with bolted guy clamps and wire rope clips, how to size one against a real strand, and how to install and inspect it. It also lists the installation rules that get broken most often in the field.
What a Guy Grip Does on an Overhead Line
Conductors pull. On a straight run the forces either side of a pole roughly cancel out, but at angle poles, dead-ends and transformer structures they do not. That unbalanced pull is what guy wires exist for: a guy strand runs from a point high on the pole down to a ground anchor, and the guy grip is the fitting that terminates the upper end of that strand.
Terminology varies by market and supplier, and it is worth recognising the synonyms before you write a specification. The same product is sold as a guy grip, a preformed guy grip, a guy grip dead end, a preformed dead end, and a guy wire dead end grip. All of them describe a helical wire assembly that wraps onto the strand and terminates it.
One clarification prevents a lot of confusion on site: a guy grip is a termination, not a tensioning device. It anchors the strand to the pole hardware and holds whatever tension the crew sets. Adjusting that tension is the job of the anchor rod, the turnbuckle, or the strain insulator assembly — not of the grip.
How a Preformed Guy Grip Works
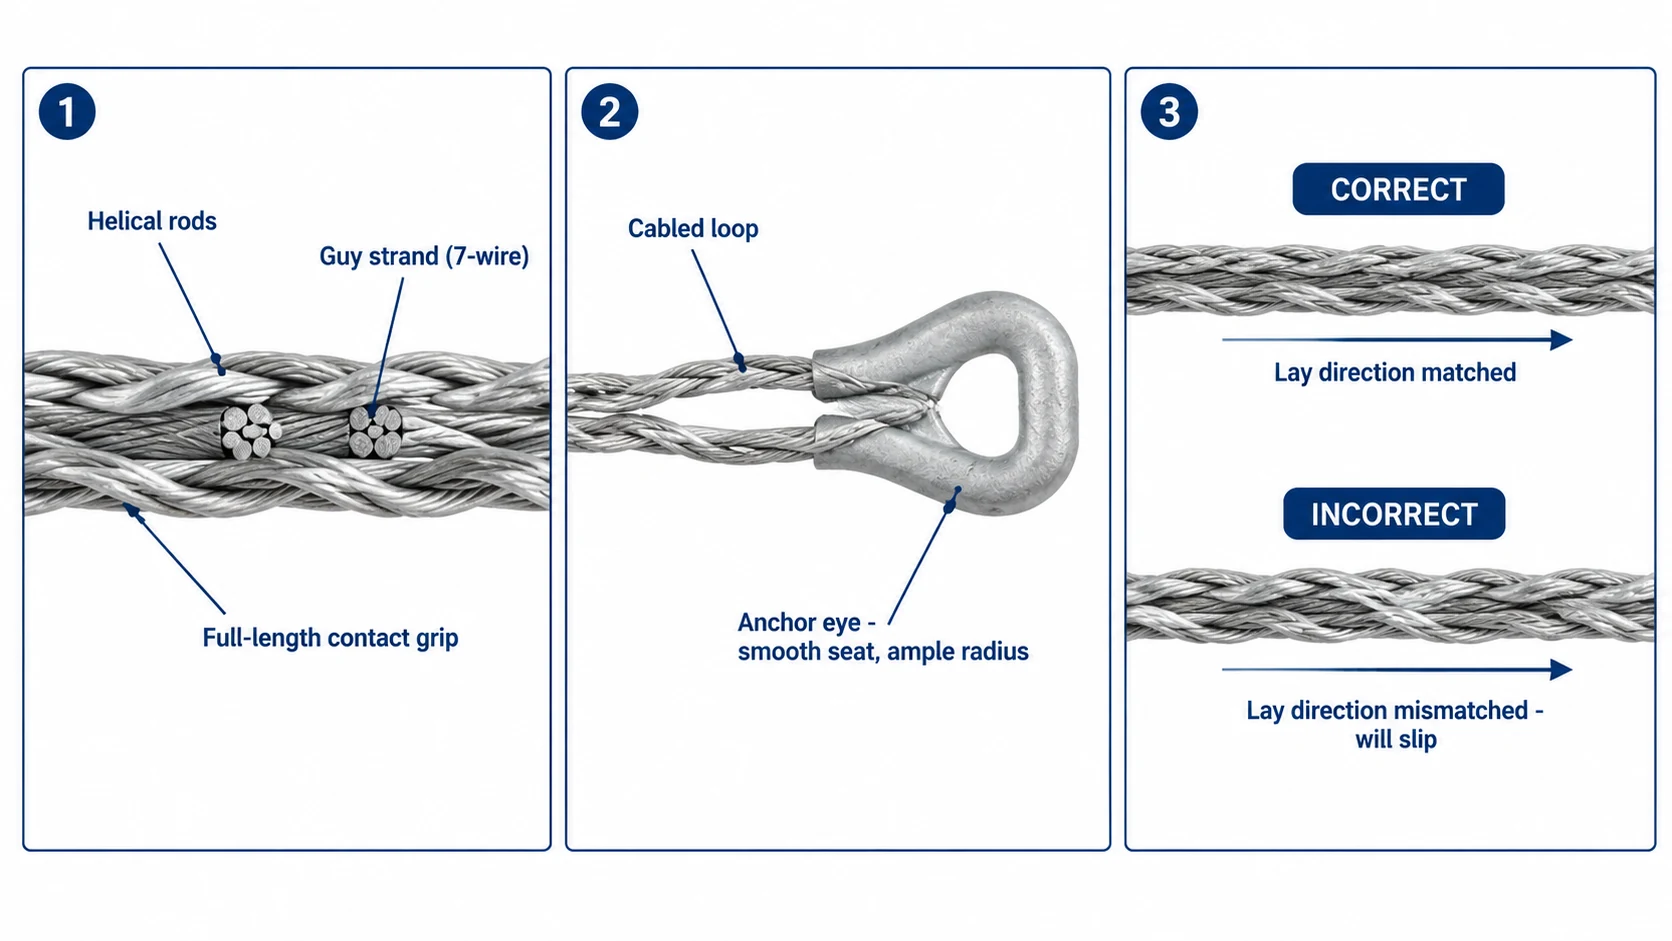
A preformed grip is made from high-strength wires factory-formed into a helix that matches the diameter, the construction and the lay of one specific strand size. That last point is easy to overlook: the helix has to follow the valleys between the strand’s outer wires, so a grip formed for a left-hand lay strand will not seat on a right-hand lay strand.
When the guy is tensioned, the helix tries to unwind. Because the rods cannot ride up over the strand, that tendency converts into a tightening force — the rods are drawn down into the valleys and grip along their entire contact length. Two practical consequences follow.
- The load is spread rather than concentrated. A bolted clamp presses the strand at one or two narrow bands. A preformed grip presses along a long helical path. The pressure per unit of strand surface is far lower, which is why the outer wires are not notched, crushed or fatigued at a single point.
- Holding strength comes from fit, not from a setting. There is no torque value to specify and no bolt to work loose in service. Manufacturers typically publish holding strength approaching the rated breaking strength of the strand the grip is matched to — but that figure is only valid when the diameter, the lay direction and the rod length are all correct.
Three features identify the product on sight. The helical rods are the legs that do the gripping. The cabled loop is the factory-formed eye that takes the anchor hardware. The colour mark on one leg identifies the strand size or construction the grip is made for.
Guy Grip vs Bolted Guy Clamp vs Wire Rope Clip
There is more than one way to terminate a guy strand, and the three common methods behave very differently. The comparison below is the one worth putting in front of a project engineer, because the cheapest hardware is often the one that costs the most over a 25-year service life.
| Aspect | Preformed guy grip | Bolted guy clamp | Wire rope clip (U-bolt) |
|---|---|---|---|
| How load is transferred | Along the full helical contact length | At the clamped bands of the groove plates | At the U-bolt and saddle contact points |
| Effect on the strand | Distributed pressure, no crushing | Moderate; depends on plate width and bolt torque | Point loading; reduces the strand’s effective strength |
| Setting to control | None — fit is geometric | Bolt torque, applied evenly | Bolt torque plus clamp spacing and saddle orientation |
| Tools | None beyond normal line tools | Wrench or torque wrench | Wrench or torque wrench |
| Reuse | Single use in permanent service | Reusable, subject to inspection | Reusable on light or temporary work |
| Typical use | Permanent guys on distribution and transmission poles, antenna and tower guys | Where a re-usable or adjustable termination is needed; multi-groove plates for heavier strand | Light-duty and temporary guys, terminations where the loop is clamped back on itself |
| Main watch-out | Must match strand size and lay direction exactly | Uneven bolt torque lets the strand creep | Reduces strand strength; “never saddle a dead horse” orientation rule |
Single-groove bolt clamps are for light loads. Heavier work uses two matching plates with parallel grooves secured by three shoulder bolts, which spreads the grip across a wider band — the same parallel-groove principle used in parallel groove clamps for conductor connections, where three bolts and a matched groove pair are also what keep the joint stable under load cycling.
How to Choose a Guy Grip
1. Match the strand diameter, construction and lay
This is the decision that makes or breaks the installation, and it is the one buyers most often reduce to a single number. The grip is matched not only to the strand’s nominal size but to its construction — 3-wire, 7-wire or 19-wire — and to its lay direction. Measure the strand with a caliper and confirm the construction and lay against the stranded designation rather than relying on the purchase order description. Unless the supplier’s chart explicitly covers all three parameters, ask before ordering.
2. Confirm the strength requirement, then apply a safety factor
Work from the strand’s rated breaking strength, not from the expected guy load. Manufacturers publish grip holding strength as a proportion of the rated breaking strength of the matched strand, so the safe approach is to select a grip and strand combination whose published figure covers your design load with the safety factor your utility or project standard requires. Separately, keep the installed tension reasonable: leading preformed-grip manufacturers advise maintaining guy tension at a minimum of roughly 10% of the strand’s rated breaking strength, which also keeps the grip properly seated and dampens vibration.
3. Choose materials for the environment
Three material families are common. Hot-dip galvanized steel is the default for inland and general utility work. Aluminium-clad steel and stainless steel appear where corrosion or weight drives the choice, and coastal, industrial or high-humidity sites justify stainless 304 or 316. Match the grip material to the strand material — a galvanized grip on galvanized strand is the normal pairing — and give some thought to dissimilar metals where the grip’s loop meets the anchor hardware, since that contact point is where corrosion usually shows up first.
4. Check that the mating hardware can actually seat the loop
A grip is only as good as the hardware its loop sits in. The loop must land on a smooth-contoured seat with an ample radius, and it must sit completely in the proper groove so the individual wires of the loop do not lie across a ridge. This is why manufacturers warn against applying preformed grips to drive hooks, eye bolts and nuts, none of which have the radius the loop needs. The fitting also has to hold the grip in a fixed position — if the anchor hardware can rotate or spin under load, the grip cannot work as designed.
GGLDF supplies the anchor-side hardware for this kind of assembly in its hot-dip galvanized iron fittings range. The pig tail hook with sheep eye ring and iron hanging ring is a typical example of the formed-eyes and hooked attachments used on pole hardware, and the same range covers U-shaped clamps and O-rings for circuit and stay hardware.
5. Read the colour code from the manufacturer, not from another brand
Colour marks exist so a lineman can identify a grip’s strand size on the pole without a catalogue. The catch is that the colour schemes are not universal — two suppliers can, and do, use different colours for the same strand size. Treat the colour mark as a confirmation aid for a grip you have already matched by part number, never as the primary selection method, and insist that the supplier’s chart travels with the shipment.
Reading Guy Strand Sizes
Guy strand is still specified in imperial sizes in most utility markets, with the metric equivalent quoted alongside. The table below covers the sizes seen on the majority of overhead line guying work; the measured diameter varies with construction, so always confirm against the actual strand.
| Nominal strand size | Metric equivalent | Constructions in common use | Typical application |
|---|---|---|---|
| 3/16 in | ≈ 4.8 mm | 3-wire, 7-wire | Light guys on distribution poles |
| 1/4 in | ≈ 6.4 mm | 7-wire | General distribution pole guying |
| 5/16 in | ≈ 7.9 mm | 7-wire | Distribution poles, heavier angle structures |
| 3/8 in | ≈ 9.5 mm | 7-wire | Transmission and heavy distribution guys |
| 7/16 in | ≈ 11.1 mm | 7-wire | Transmission structures |
| 1/2 in | ≈ 12.7 mm | 7-wire, 19-wire | Heavy transmission and tower guys |
How to Install a Guy Grip
Before you climb
Confirm four things: that the grip part number matches the strand’s size, construction and lay; that the anchor hardware gives the loop a smooth, fixed seat with an adequate radius; that the guy has been tensioned with the correct equipment so you are not asking the grip to do the pulling; and that the crew knows the grip is a single-use component that must not be used as a come-along, a pulling-in grip or a false dead-end.
Step-by-step for a preformed guy grip
- Inspect the grip and the strand. Check the rods for distortion or damage before installation. Clean the strand and remove dirt, oil and rust so the rods can seat properly.
- Set the guy tension first. Apply and tension the guy strand with the normal equipment. The grip terminates the strand; it does not tension it.
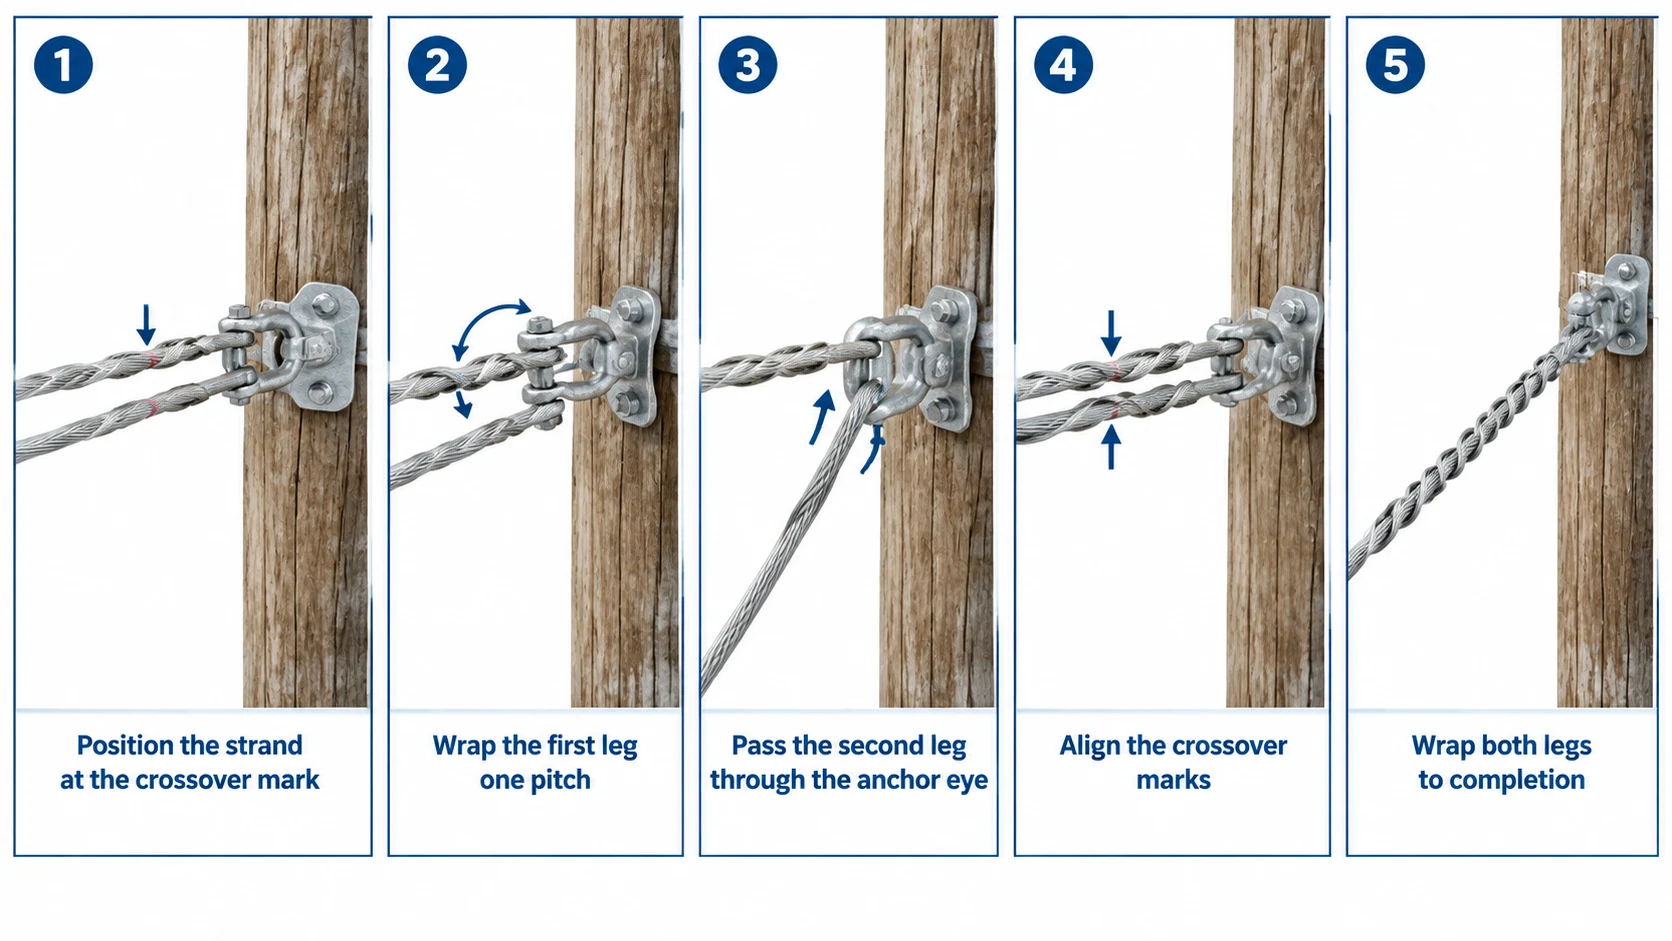
- Position the strand at the crossover mark. Place the strand into the grip at the crossover mark nearest to the loop, and pull the strand through with your hand to remove as much slack as possible.
- Align the loop with the anchor. Line the loop of the grip up with the groove in the anchor eye, checking that the loop sits fully in the seat and not across a ridge.
- Wrap the first leg. Hold the strand tail in place at the crossover mark and wrap the first leg of the grip onto the strand for one pitch length.
- Wrap the second leg. Pass the second leg through the anchor eye, line up the crossover marks on both legs, and wrap the second leg onto the strand for one pitch length.
- Release the tensioning equipment slowly. Let the strand take up through the grip until the guy is at its working tension and the load is shared as intended.
- Wrap both legs to completion. With the tension set, wrap the legs onto the strand the full remaining length. Make sure every rod end is snapped into place before the hoist or tensioner is fully released.
- Verify the finished assembly. Confirm that both legs are fully wrapped, no rods are crossed or lifted, the loop is seated in the hardware, and the grip cannot rotate or shift on its seat.
Installations differ between grip types and between utilities, so treat the sequence above as the general method and follow the instruction sheet supplied with the specific product.
Installation rules that are easy to break
- Lay direction mismatch. The grip and the strand must have the same lay direction — most guy strand is left-hand lay, but “most” is not “all”. A mismatched grip slips instead of gripping.
- Forcing an oversized or undersized grip. A grip that will not wrap by hand is the wrong grip. Never drive it on.
- Seating the loop on the wrong hardware. Drive hooks, eye bolts and nuts do not have the radius the loop needs, and hardware that can rotate or spin under load is unsuitable.
- Using the grip as a tool. Preformed grips must not be used as come-alongs, pulling-in grips or false dead-ends, and must not be modified in any way.
- Loading an incompletely wrapped grip. Every rod end must be snapped into place before full load is applied, otherwise the effective grip length is short and the strand creeps.
- Mixing materials carelessly. A plain-steel loop against a stainless anchor, or a galvanized grip on a different strand finish, moves the corrosion problem to the joint.
Inspection, Retensioning and Replacement
Guy grips need little attention, but the attention they need is specific. Inspect the run in the first few months after installation, when settling and creep are most likely, and then on the normal network inspection cycle — a six- to twelve-month interval is a common field practice. Look for four things: strand movement through the grip, rod ends that are no longer snapped into place, rust staining at the loop and anchor contact, and any sign that the hardware has rotated on its seat.
Retensioning has a defined window. Leading manufacturers document that a preformed dead-end may be removed and reapplied up to two times within the first three months purely to retension the guy; after that period, a new dead-end should be used if the grip has to come off. Outside that window, treat removal as retirement. Replace, do not rewrap, any grip that is deformed, corroded, damaged by impact, or that has been subjected to an overload or a fault current.
When hardware is being swapped, support the strand so the load is never transferred to a splice, and check the anchor hardware at the same time — a worn or rusty eye can undo the work of a perfectly installed grip. For a wider view of how guy terminations fit into the rest of the line, see our guide to the components of an overhead power line.
Frequently Asked Questions
What is the difference between a guy grip and a guy clamp?
A guy grip is a preformed helical assembly that wraps around the strand and terminates it. A guy clamp is a bolted fitting that clamps the strand, either to itself to form a loop or to another component. The grip spreads load along its whole helical contact length; a bolted clamp concentrates it at one or two bands. Both are legitimate terminations — the choice depends on whether you want a single-use, torque-free termination or a re-usable, adjustable one.
Can a guy grip be reused?
As a permanent termination, no. It is designed for a single installation. There is a narrow documented exception: a grip may be removed and reapplied up to twice within the first three months to retension the guy, after which a new grip should be fitted. A grip that has been overloaded, deformed or corroded is not reusable under any circumstances.
Why does a guy grip slip?
Slipping almost always traces back to fit. The common causes are a grip matched to the wrong strand diameter, a grip whose lay direction does not match the strand’s, a grip that was only partly wrapped before load was applied, or an installation on hardware that lets the assembly rotate. Strand contamination — oil, dirt or heavy rust — also reduces the friction the helix depends on.
What is the crossover mark for?
The crossover mark shows where the two legs of the grip cross over each other and where the strand should be positioned relative to the grip. Aligning the strand to that mark and matching the crossover marks of both legs during installation is what ensures the grip is centred on the strand and that the full rod length engages. Ignore the mark and part of the grip does no work.
Do guy grips work on ADSS and OPGW cable?
Not the same grips. Fibre optic cable uses dedicated helical dead-end and suspension assemblies designed for the cable’s specific diameter, strength member and minimum bend radius, because the permissible mechanical load and crush resistance are completely different from guy strand. Never substitute a guy strand grip on an optical cable or the reverse.
How tight should a guy wire be?
Tight enough to hold the structure, and not so tight that the strand is worked near its limit. Leading manufacturers advise maintaining guy tension at a minimum of approximately 10% of the strand’s rated breaking strength. The upper limit comes from the structure design and the anchor capacity, so set tension to the value in the pole loading calculations rather than to a rule of thumb carried up the ladder.
Sourcing Guy Grips and Guy Hardware
Guy hardware is one of those categories where a small specification error causes a large field problem, so the useful conversation with a supplier is about strand data rather than about price per piece. Send the strand size, construction and lay direction, the design tension, and the anchor hardware the loop has to seat in — and ask for the grip’s holding strength relative to the matched strand, the material and coating, and the size identification chart for the range.
GGLDF manufactures preformed guy grips in its hot-dip galvanized ANJ guy grip range, together with the galvanized pole and stay hardware that goes with them. Share your strand specification and anchor detail with our team and we will confirm the matching grip size and the parts that seat it — get in touch with our technical sales team.